Integration with Vue.js
This guide will provide you with a step-by-step walkthrough of the process of integrating MonoCloud using the oidc-client-ts library with a Vue.js application.
Here are the general steps necessary to integrate MonoCloud into a Vue.js application. Refer to the detailed explanation for more information:
- Configure MonoCloud
- Sign up for a MonoCloud account.
- Create a new client with the Single Page Application preset and configure it with specific settings like scopes and URIs.
- Create the Vue Application
- Create a new Vue application with Typescript support.
- Install OIDC Client TypeScript Library
- Install the
oidc-client-tslibrary in your Vue project.
- Install the
- Configure the Port
- Configure the the vite.config.ts file to run the server on port 3000.
- Get Environment Variables
- Log in to the MonoCloud Dashboard and obtain the Tenant Domain and Client ID from the General Settings of your client.
- Configure the UserManager
- Create a file named
user-manager.tsin your project'ssrcdirectory. This file sets up and configures an instance of theUserManagerprovided by theoidc-client-tslibrary.
- Create a file named
- Configure OIDC Callback Route
- Create an
OidcCallback.vueinside thesrc/viewsdirectory for handling the OIDC callback operations. - Update the router configurations in the
index.tsfile inside thesrc/routerdirectory.
- Create an
- Add the Global User Provider
- Update the
main.tsfile to make the user's data available globally in your application.
- Update the
- Add the Header Component
- Create a Vue component,
Header.tsx, which renders a header based on the user's authentication status. - Update the contents in
App.vueto add the header for your application:
- Create a Vue component,
- Run and Access the App
- Start the development server and access your application in a web browser.
Configure MonoCloud
Sign Up with MonoCloud
To get started with integrating authentication in your Vue.js application, you'll need to:
- Sign up for a MonoCloud account. Once you're signed up with MonoCloud, you can configure the required application settings to integrate with MonoCloud.
- Create a Project in the MonoCloud Dashboard:
- Enter your Project name, Domain name, and select your Preferred region.
- Click Create Project.
Add a New Client in MonoCloud
To use MonoCloud, you need to set up a client in the MonoCloud Dashboard. A client in MonoCloud represents an application within a Project and includes essential configuration details required for integrating that application with MonoCloud.
Follow the steps below to add a new client to the MonoCloud Dashboard:
- Go to Clients.
- Click Add Client.
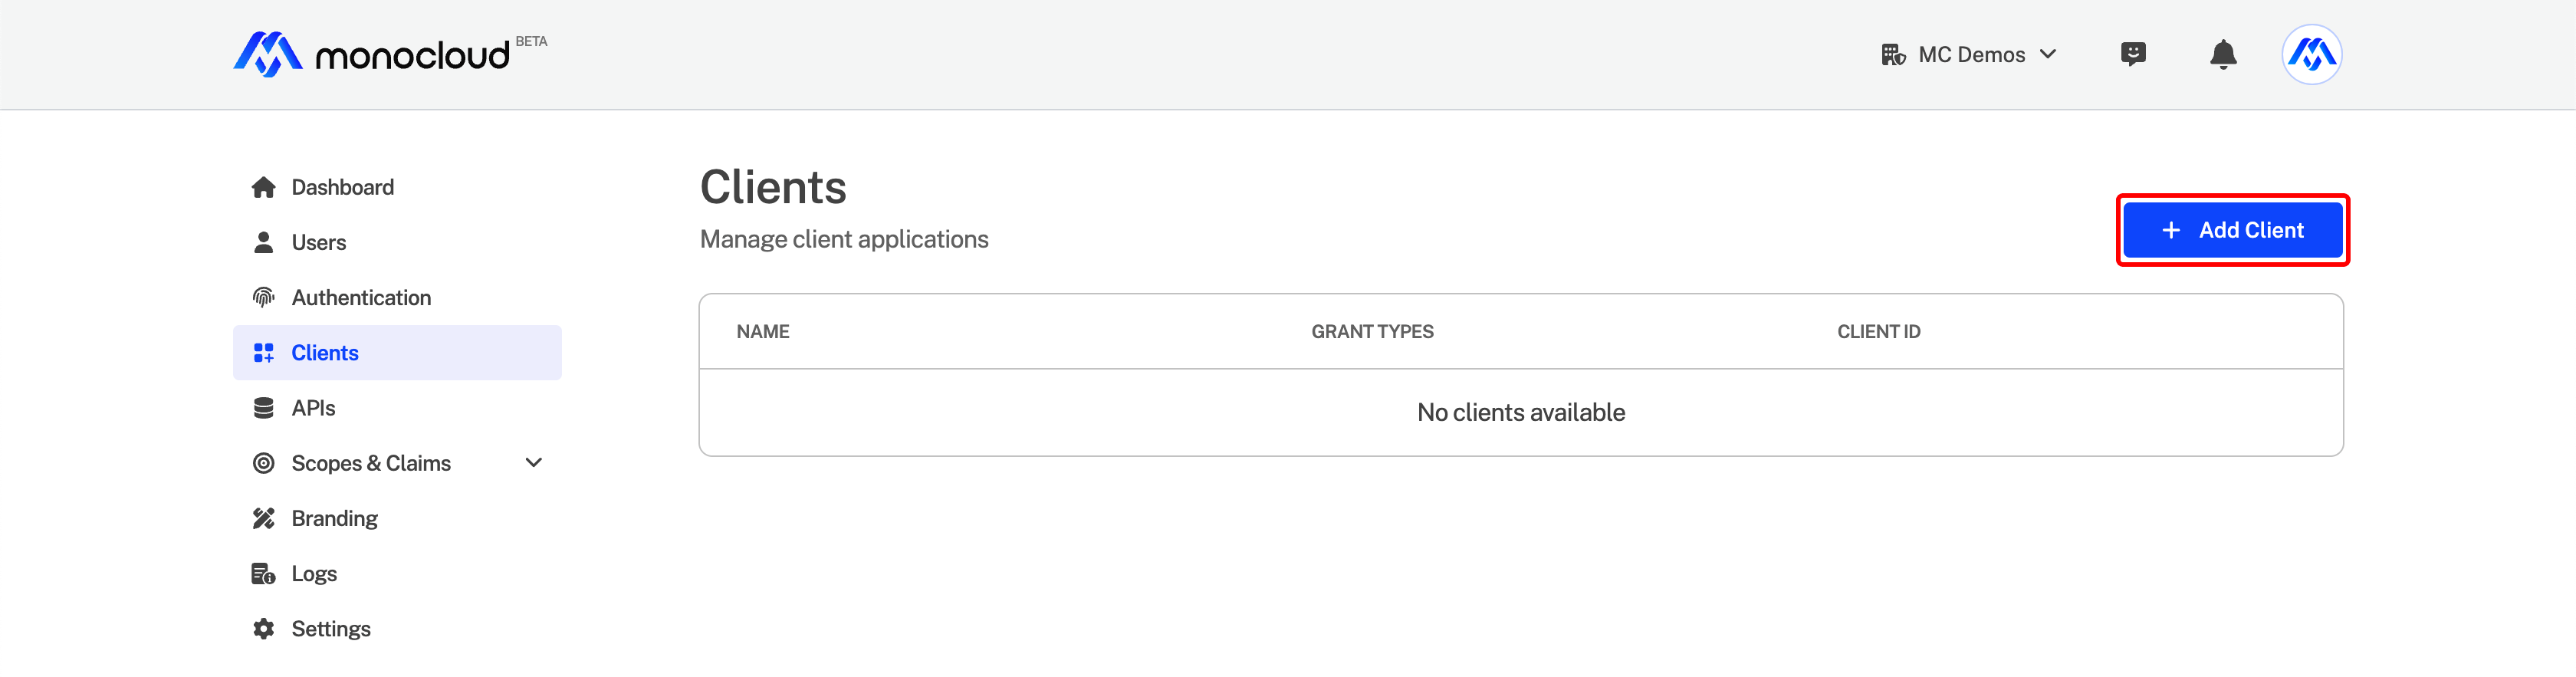
- Enter a Client Name.
- Select Single Page Application as the application type.
- Click Save Changes.
Configuring Client Settings in MonoCloud
Once you've added a new client in MonoCloud, you'll need to configure the following settings to integrate your application with MonoCloud:
- Callback URIs: This is the address where the users are redirected to after successful logins
- Sign-out URIs: This is the address where the users are redirected after they've signed out.
- Cross-Origin URIs indicate any origins (domain, scheme, and port) from where a browser should permit loading resources.
- Scopes: defines what specific user information or resources the client application can access once a user is authenticated.
Follow the steps below to configure these settings in MonoCloud:
- Go to the MonoCloud Dashboard > Clients.
- Click on the application's name.
- In the URLs section:
- Enter the Callback URI and click the
+button.
http://localhost:3000/oidc-callback to test the configuration locally.
- Enter Sign-out URI and click the
+button.
http://localhost:3000 to test the configuration locally.
- Enter Cross Origin URI and click the
+button.
http://localhost:3000 to test the configuration locally.
- In the Allowed Scopes section, select the scopes required. In this example, we will select
openid,profile, andemailIdentity scopes.
Setup a new Vue Project
To create a new Vue app, follow these steps:
Open your terminal and create a new Vue project by executing one of the following commands, depending on your package manager:
npm create vue@latest
You will be prompted to provide a name for the Vue project and asked to configure several optional features. Select Yes for Add TypeScript? and Add Vue Router for Single Page Application development?. You can configure the other options as per your project requirements.
Install OIDC Client Library
In this example we use the oidc-client-ts library to authenticate users in your application. You must install the oidc-client-ts library in your by following the steps below.
- Navigate to the newly created project and execute the following command:
cd vue-project
- Install the
oidc-clientlibrary in your project, by executing the following command:
npm install oidc-client-ts --save
Configure the Port for the Development Server
Follow the steps below to configure the development server to run on port 3000:
- Go to your newly created vue project and open
vite.config.ts. - Add the highlighted code in the
vite.config.tsfile:
import { fileURLToPath, URL } from 'node:url'

import { defineConfig } from 'vite'
import vue from '@vitejs/plugin-vue'

// https://vitejs.dev/config/
export default defineConfig({
  plugins: [vue()],
  resolve: {
    alias: {
      '@': fileURLToPath(new URL('./src', import.meta.url))
    }
  },
+  server: {
+    port: 3000,
+  },
})
Integrate MonoCloud into your Vue Application
To ensure successful integration of MonoCloud in your app, you must configure the necessary authentication components in your Vue application.
Get the Environment Variables
The UserManager component provided by the oidc-client-ts library requires the following variables from MonoCloud:
authorityandclient_Id: These properties should match the Tenant Domain and Client ID found in the General Settings section of your registered client.
To retrieve these values, follow the steps below:
- Go to the MonoCloud Dashboard > Clients.
- Click on the client's name.
- From the General Settings section, copy the Tenant Domain and Client ID values.

Configure the UserManager
Follow the steps below to configure the OIDC Client:
- Create a file named
user-manager.tsin your project'ssrcdirectory. - In the newly created file, insert the following code:
import { UserManager, WebStorageStateStore } from "oidc-client-ts";

const userManager = new UserManager({
    authority: 'https://<your-domain>',
    client_id: '<your-client-id>',
    redirect_uri: 'http://localhost:3000/oidc-callback',
    post_logout_redirect_uri: 'http://localhost:3000',
    scope: 'openid profile email',
    response_type: 'code',
    loadUserInfo: true,
    userStore: new WebStorageStateStore({ store: sessionStorage }),
});

export default userManager;
This code sets up and configures an instance of the UserManager provided by the oidc-client-ts library.
redirect_uri and post_logout_redirect_url is consistent with the value of the Callback URIs and Sign out URIs in MonoCloud.
Configure the OIDC Callback Route
- Create an
OidcCallback.vueinside thesrc/viewsdirectory for handling OIDC callback operations. - Add the following code in the
OidcCallback.vuefile:
<script setup lang="ts">
import userManager from '@/user-manager';
import { onMounted } from 'vue';
import { useRouter } from 'vue-router';

const router = useRouter();

onMounted(async () => {
  try {
    await userManager.signinRedirectCallback();
    router.push('/');
  } catch (err) {
    console.log(err);
  }
});
</script>

<template>
  <div></div>
</template>
- Update the router configurations in the
index.tsfile inside thesrc/routerdirectory.
import { createRouter, createWebHistory } from 'vue-router'
import HomeView from '../views/HomeView.vue'
+import OidcCallback from '../views/OidcCallback.vue'

const router = createRouter({
  history: createWebHistory(import.meta.env.BASE_URL),
  routes: [
    {
      path: '/',
      name: 'home',
      component: HomeView
    },
    {
      path: '/about',
      name: 'about',
      // route level code-splitting
      // this generates a separate chunk (About.[hash].js) for this route
      // which is lazy-loaded when the route is visited.
      component: () => import('../views/AboutView.vue')
+   },
+   {
+     path: '/oidc-callback',
+     name: 'oidc-callback',
+     component: OidcCallback,
+   }
  ]
})

export default router
Add the Global User Provider
- Update the contents of the
main.tsfile located in the/srcfolder with the following code to ensure the user data is globally available within your application.
import './assets/main.css'
-import { createApp } from 'vue'
+import type { User } from 'oidc-client-ts';
+import { createApp, ref, type Ref } from 'vue'
import App from './App.vue'
import router from './router'
+import userManager from './user-manager';

const app = createApp(App)

+const userRef = ref<User | undefined | null>(undefined);

+userManager.getUser().then(x => {
+    userRef.value = x;
+});

+userManager.events.addUserLoaded(x => {
+    userRef.value = x
+});

+app.provide('user', userRef);

app.use(router)

app.mount('#app')
Add the Header component
- Create a Vue component,
Header.vue, that displays UI elements based on the current authentication state of a user. - Add the following code in the
Header.vuefile:
<script setup lang="ts">
import type { User } from 'oidc-client-ts';
import { inject, type Ref } from 'vue';
import userManager from '@/user-manager';
const userRef = inject<Ref<User | undefined | null>>('user');
const signIn = () => userManager.signinRedirect();
const signOut = () => userManager.signoutRedirect();
</script>

<template>
  <div v-if="userRef" class="items">
      <h3>Logged in as {{ userRef.profile.email }} 🎉</h3>
      <button @click="signOut">Logout</button>
  </div>

  <div v-if="!userRef" class="items">
      <h3>Not Logged in!</h3>
      <button @click="signIn">Login</button>
  </div>
</template>

<style scoped>
.items {
  display: flex;
  gap: 10px;
  margin-bottom: 20px;
}
</style>
- Update the contents in
App.vuewith the following code to define a layout for your application:
<script setup lang="ts">
import { RouterLink, RouterView } from 'vue-router'
import HelloWorld from './components/HelloWorld.vue'
+ import Header from './components/Header.vue'
</script>

<template>
  <header>
    <img alt="Vue logo" class="logo" src="@/assets/logo.svg" width="125" height="125" />

    <div class="wrapper">
+      <Header />
      <HelloWorld msg="You did it!" />

      <nav>
        <RouterLink to="/">Home</RouterLink>
        <RouterLink to="/about">About</RouterLink>
      </nav>
    </div>
  </header>

  <RouterView />
</template>

<style scoped>
header {
  line-height: 1.5;
  max-height: 100vh;
}

.logo {
  display: block;
  margin: 0 auto 2rem;
}

nav {
  width: 100%;
  font-size: 12px;
  text-align: center;
  margin-top: 2rem;
}

nav a.router-link-exact-active {
  color: var(--color-text);
}

nav a.router-link-exact-active:hover {
  background-color: transparent;
}

nav a {
  display: inline-block;
  padding: 0 1rem;
  border-left: 1px solid var(--color-border);
}

nav a:first-of-type {
  border: 0;
}

@media (min-width: 1024px) {
  header {
    display: flex;
    place-items: center;
    padding-right: calc(var(--section-gap) / 2);
  }

  .logo {
    margin: 0 2rem 0 0;
  }

  header .wrapper {
    display: flex;
    place-items: flex-start;
    flex-wrap: wrap;
  }

  nav {
    text-align: left;
    margin-left: -1rem;
    font-size: 1rem;

    padding: 1rem 0;
    margin-top: 1rem;
  }
}
</style>
Run and Access the App
You are now ready to start your application's development server by running the following command:
npm run dev
You can now access your application from your web browser. Go to http://localhost:3000 to access your application.
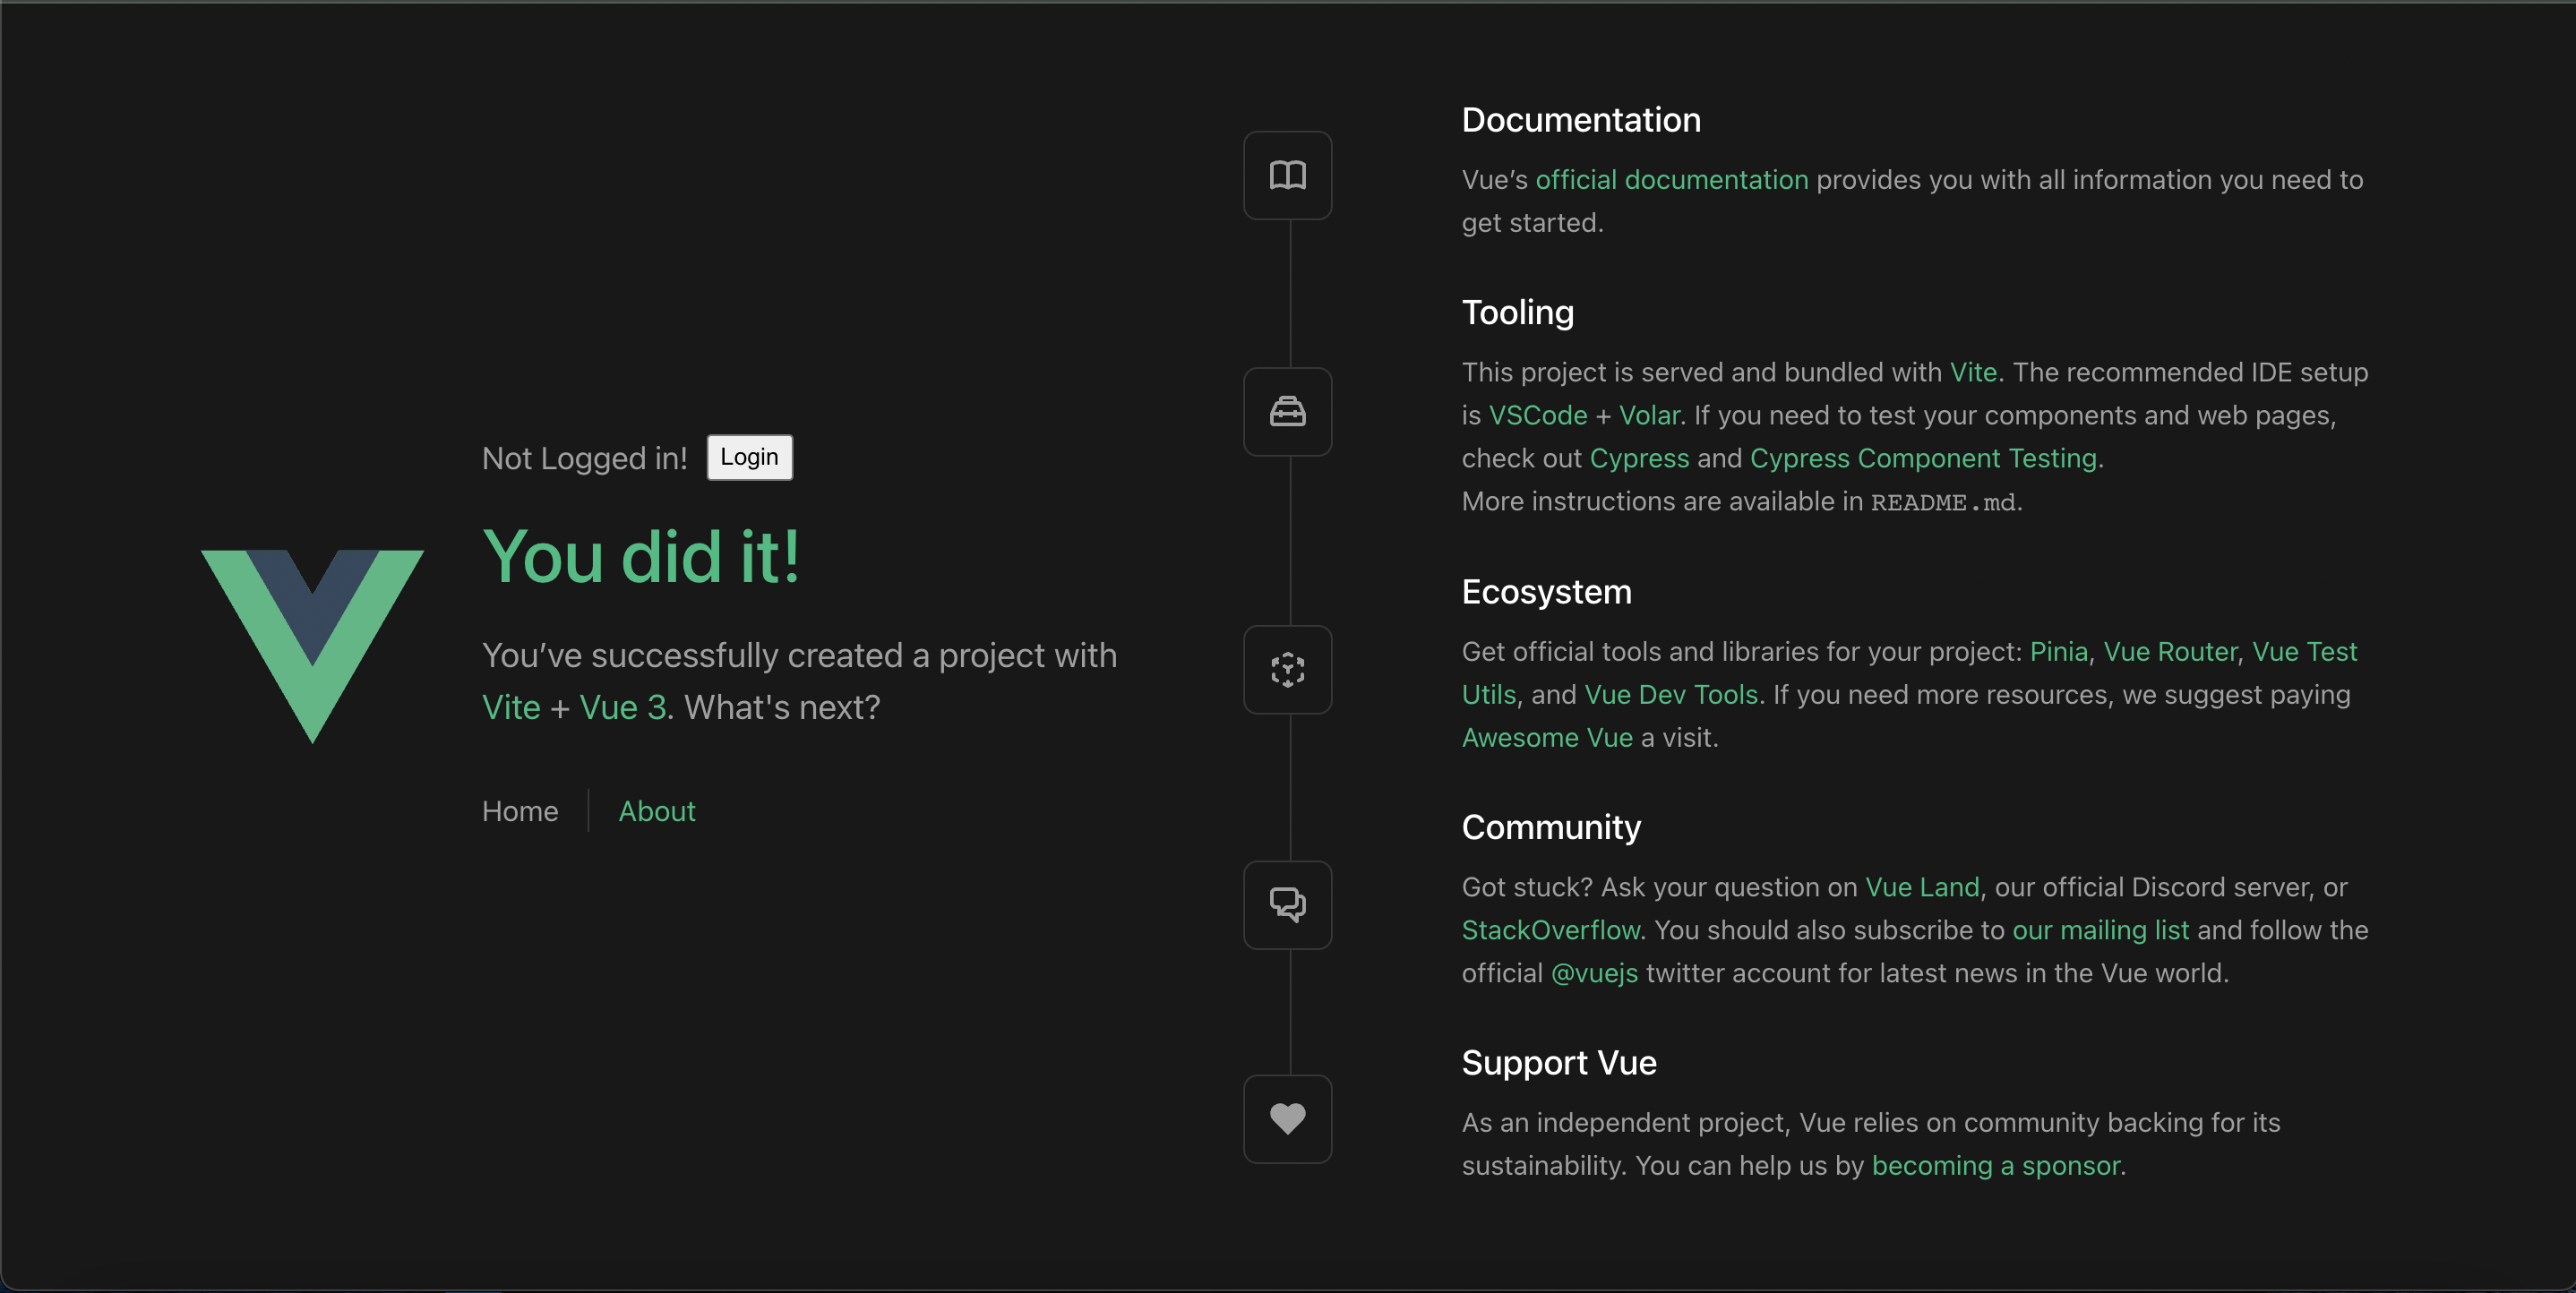
When you click on the Login button, you will be redirected to the MonoCloud login page. After successfully completing the sign-up process, you will gain access to the application.
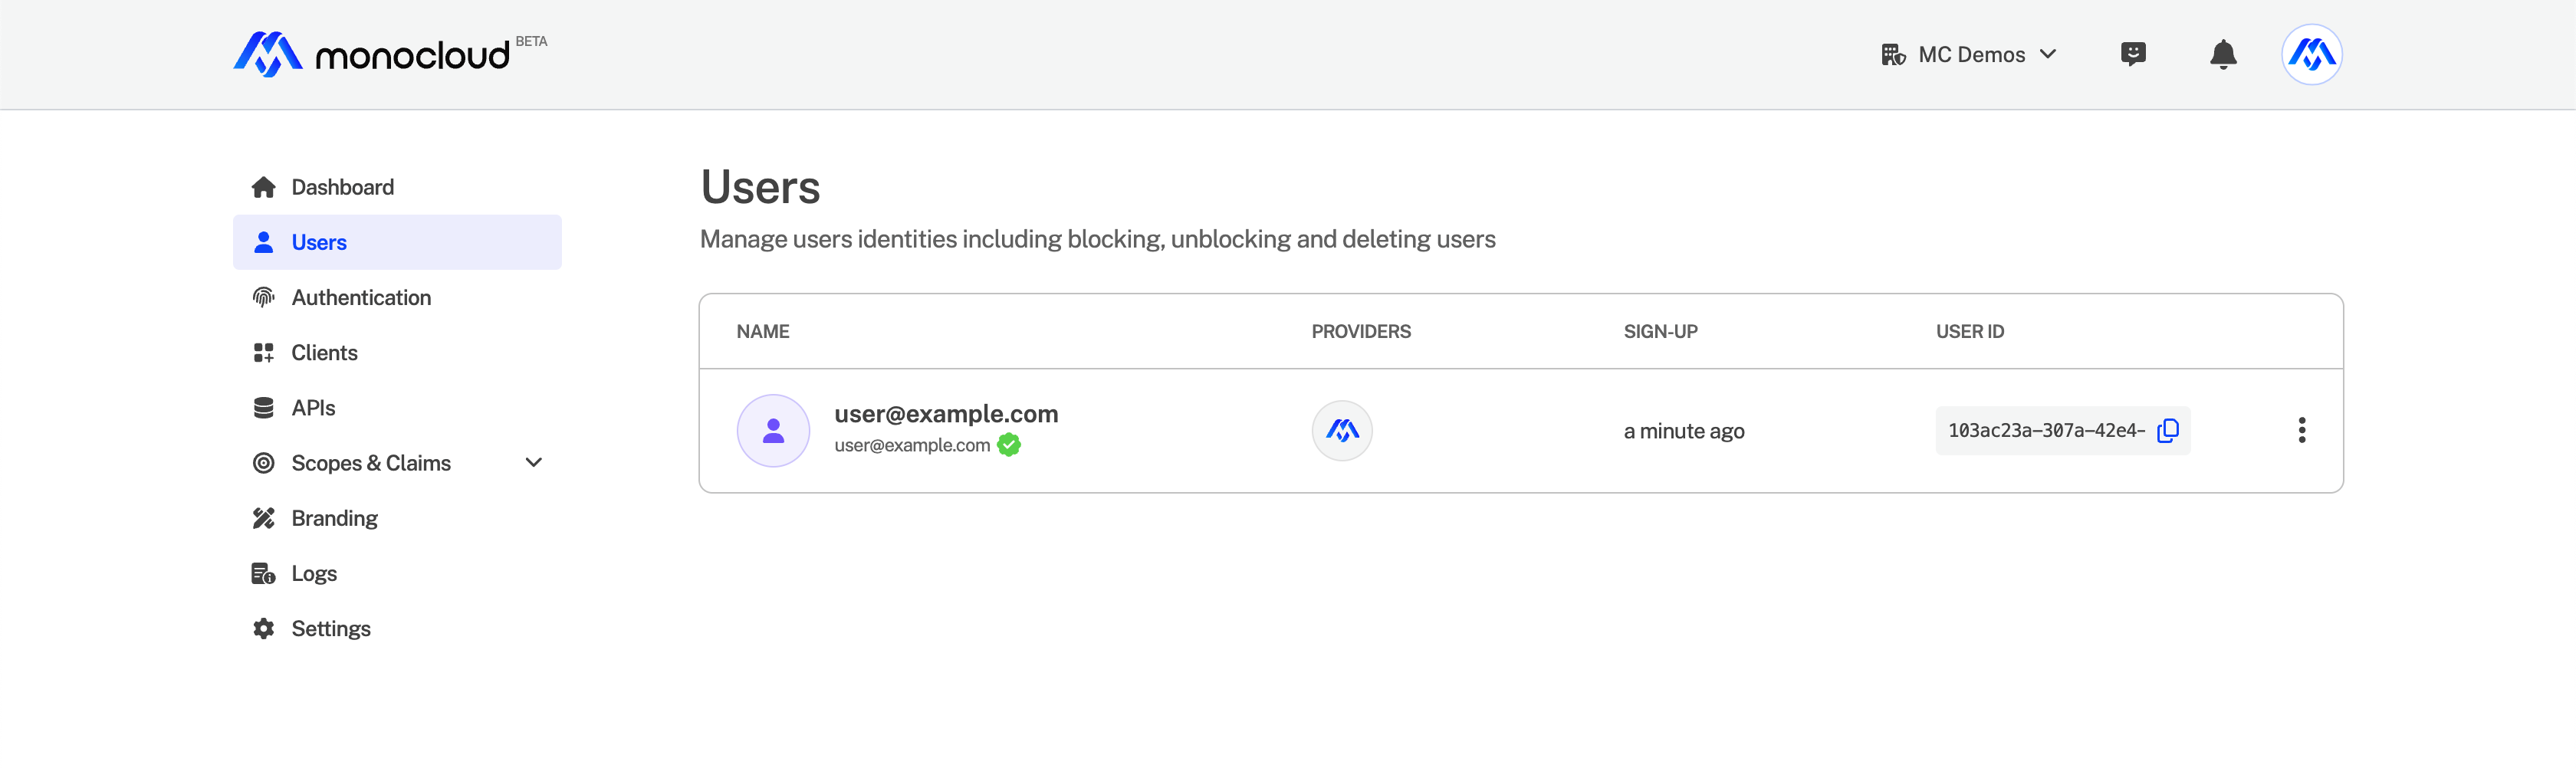
You can view the registered users from the Users section in the MonoCloud Dashboard.
Well done! You have now established secure user authentication in your Vue project.