Node.js Express Integration Guide
This guide is designed to help you integrate MonoCloud into your Node.js Express application using the Passport.js library.
Following are the general steps required to integrate MonoCloud into a Node.js application. Refer to the detailed explanation for each step to learn more:
- Configure MonoCloud
- Sign up for a MonoCloud account.
- Create a new client with the Web Application preset and configure it with specific settings like scopes and URIs.
- Create a Node.js Application
- Create a new Node application with default settings.
- Install Dependencies
- Install the dependencies required to integrate MonoCloud in your Node.js Express project.
- Get Environment Variables
- Log in to the MonoCloud Dashboard and obtain the Tenant Domain, Client ID, and Client Secret from the General Settings of your client.
- Setup Environment Variables
- Create a new file named
.env.localto set environment variables in your local project.
- Create a new file named
- Configure a Basic Node.js Express Server
- Create a file named
index.jsin your project's root directory to add a basic web server using Express. - Create a file named
index.ejsinside theViewsfolder to add a template for the home page. - Change the type of the project to
moduleand add the start script.
- Create a file named
- Configure authentication with MonoCloud using Passport.js.
- Load environment variables from
.env.localusing the dotenv package. - Setup the MonoCloudStrategy usign Passport.js with the required configuration options.
- Load environment variables from
- Add the Routes
- Update the router configurations in the
index.jsfile in the root directory of your project. - Redirect authenticated users to the home page of your application
- Update the router configurations in the
- Add Login and Logout Buttons
- Update the
index.ejsfile inside the Views folder to add the login and logout buttons.
- Update the
- Run and Access the Application
- Start the development server and access your application in a web browser.
Configure MonoCloud
Sign Up with MonoCloud
To get started with integrating authentication in your Node application, you'll need to:
- Sign up for a MonoCloud account. Once you're signed up with MonoCloud, you can configure the required application settings to integrate with MonoCloud.
- Create a Project in the MonoCloud Dashboard:
- Enter your Project name, Domain name, and select your Preferred region.
- Click Create Project.
Add a New Client in MonoCloud
To use MonoCloud, you need to set up a client in the MonoCloud Dashboard. A client in MonoCloud represents an application within a Project and includes essential configuration details required for integrating that application with MonoCloud.
Follow the steps below to add a new client to the MonoCloud Dashboard:
- Go to Clients.
- Click Add Client.
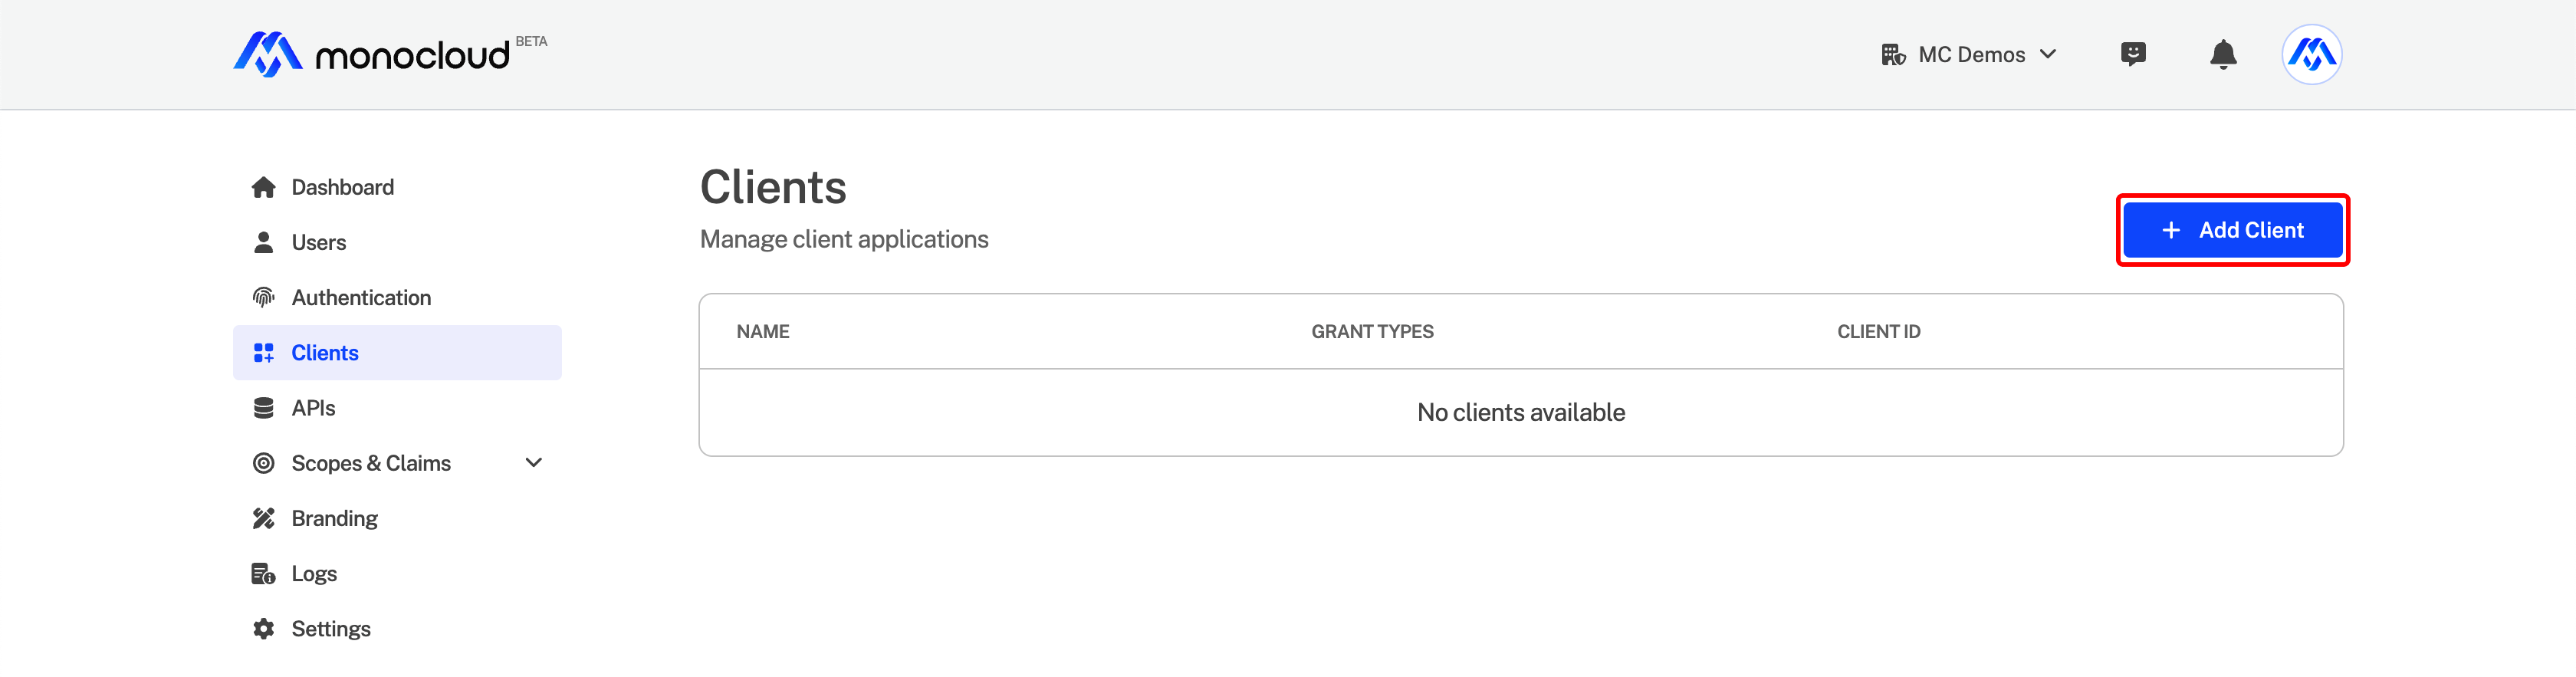
- Enter a Client Name.
- Select Web Application as the application type.
- Click Save Changes.
Configuring Client Settings in MonoCloud
Once you've added a new client in MonoCloud, you'll need to configure the following settings to integrate your application with MonoCloud:
- Callback URIs: This is the address where the users are redirected to after successful logins
- Sign-out URIs: This is the address where the users are redirected after they've signed out.
- Scopes: defines what specific user information or resources the client application can access once a user is authenticated.
Follow the steps below to configure these settings in MonoCloud:
- Go to the MonoCloud Dashboard > Clients.
- Click on the client's name.
- In the URLs section:
- Enter the Callback URI and click the
+button.
http://localhost:3000/login/callback to test the configuration locally.
- Enter Sign-out URI and click the
+button.
http://localhost:3000/logout/callback to test the configuration locally.
- In the Allowed Scopes section, select the scopes required. In this example, we will select
openid,profile, andemailfor Identity scopes.
Create a Node.js Application
To create a Node.js application, follow the steps below:
In your terminal, initialize the project by executing the following command:
npm init
Install the Dependencies
You need to install the following packages in your Node.js project to integrate your application with MonoCloud:
dotenv: Load environment variables from a.envfile.express: Provides a framework for creating web servers, handling routing, and processing requests.express-session: A middleware used for managing user sessions.ejs: A templating engine used to generate dynamic HTML content.passport: A middleware for implementing user authentication.@monocloud/passport-js: The MonoCloud authentication strategy for Passport.js.
Execute the following command to download and install the packages:
npm install dotenv express express-session ejs passport @monocloud/passport-js
Get the Environment Variables
Passport.js uses the MonoCloudStrategy to set up the authentication strategy. You will need to configure the strategy with the following properties:
issuer,client_id, andclient_secret: These properties should match the Tenant Domain, Client ID, and Client Secret found in your client's settings.
To retrieve these values, follow the steps below:
- Go to the MonoCloud Dashboard > Clients.
- Click on the client's name.
- From the General Settings section, copy the Tenant Domain and Client ID values.
- From the Secrets section:
- Click on the context menu (⋮).
- Click View Secret and copy the secret key.
Setup Environment Variables
In the root directory of your Node project, create a file named .env.local and add the following code to configure the environment variables for your project:
MONOCLOUD_ISSUER=https://<your-domain>
MONOCLOUD_CLIENT_ID=<your-client-id>
MONOCLOUD_CLIENT_SECRET=<your-client-secret>
MONOCLOUD_SCOPES=openid profile email
SESSION_SECRET=<your-session-secret>
MONOCLOUD_ISSUER: Refers to the domain of your MonoCloud project and should be replace with the Tenant Domain obtained from the previous step.MONOCLOUD_CLIENT_ID: Refers to your MonoCloud application's unique client ID. Replace<your-client-id>with the Client ID provided by MonoCloud.MONOCLOUD_CLIENT_SECRET: Refers to the MonoCloud application's secret key. Replace<your-client-secret>with the client secret obtained from the previous step.MONOCLOUD_SCOPES: Refers to the scopes that your application requires during authentication. In this example, the scopes includeopenid,profile, andemail.SESSION_SECRET: This refers to a secret key used to encrypt the user's session data. You should generate a secure and random secret key and set the value here.
Configure a Basic Node.js Express Server
You will first need to scaffold a basic Express server with the EJS templating engine in your project:
- In the root directory of your project, create a file named
index.jsand add the following code:
'use strict';

import express from 'express';
import path from 'node:path';

const app = express()
const port = 3000

app.set('views', path.join('views'));
app.set('view engine', 'ejs');

app.get('/', (req, res) => res.render('index'))

app.listen(port, () => console.log(`Example app listening on port ${port}`));
- Create a folder named
Viewsin the root directory. - Create a file named
index.ejsinside theViewsfolder and add the following code:
<!DOCTYPE html>
<html>
  <head>
    <title>Node JS Application</title>
  </head>
  <body>
    <p>Welcome to the Node.js Application</p>
  </body>
</html>
- Open the
package.jsonfile, update the project type to amodule, and add the start script:
{
  "name": "monocloud-node-express-sample",
  "version": "1.0.0",
  "description": "",
  "main": "index.js",
+  "type": "module",
  "scripts": {
    "test": "echo \"Error: no test specified\" && exit 1",
+    "start": "node index.js"
  },
  "author": "",
  "license": "ISC",
  "dependencies": {
    "dotenv": "^16.3.1",
    "ejs": "^3.1.9",
    "express": "^4.18.2",
    "express-session": "^1.17.3",
    "@monocloud/passport-js": "^0.1.2",
    "passport": "^0.6.0"
  }
}
Integrate with MonoCloud using Passport.js
Now that you have completed the basic setup of your project, follow the steps below to integrate your application with MonoCloud.
Configure Authentication with MonoCloud using Passport.js
To add authentication in your Node.js Express application, you must complete the following steps:
- Load environment variables from the
.env.localfile. - Implement session management and secure user sessions by using the
express-sessionmiddleware. - Configure
Passport.jsfor authentication with MonoCloud using the MonoCloudStrategy. - Define functions to manage user data during authentication.
- Set up Passport middleware to handle the user authentication state.
Follow the steps below to configure authentication in your application:
- Open the index.js file and add the following code:
'use strict';

import express from 'express';
import path from 'node:path';
+import dotenv from 'dotenv';
+import expressSession from 'express-session';
+import passport from 'passport';
+import { MonoCloudStrategy } from '@monocloud/passport-js';

+dotenv.config({ path: '.env.local' });

+const strategy = MonoCloudStrategy.init({
+  issuer: process.env.MONOCLOUD_ISSUER,
+  client_id: process.env.MONOCLOUD_CLIENT_ID,
+  client_secret: process.env.MONOCLOUD_CLIENT_SECRET,
+  login_callback_url: 'http://localhost:3000/login/callback',
+  post_logout_redirect_url: 'http://localhost:3000/logout/callback',
+  scopes: process.env.MONOCLOUD_SCOPES
+});

const app = express()
const port = 3000

app.set('views', path.join('views'));
app.set('view engine', 'ejs');

+app.use(
+  expressSession({
+    secret: process.env.SESSION_SECRET,
+    resave: false,
+    saveUninitialized: true,
+  })
+);

+passport.use('oidc', strategy);
+passport.serializeUser((user, done) => done(null, user));
+passport.deserializeUser((user, done) => done(null, user));

+app.use(passport.initialize());
+app.use(passport.session());

app.get('/', (req, res) => res.render('index'))

app.listen(port, () => console.log(`Example app listening on port ${port}`));
login_callback_url and post_logout_redirect_url is consistent with the value of the Callback URIs and Sign out URIs in MonoCloud.
Add the Routes
- Add the following code in the
index.jsfile to add the login, logout and callback routes:
...
// This is already in the file, just for reference on where to add the code
app.use(passport.initialize());
app.use(passport.session());

app.get('/', (req, res) => res.render('index'))

+app.get('/login', passport.authenticate('oidc', { scope: 'openid profile email' }));
+app.get('/login/callback', (req, res, next) => passport.authenticate('oidc', { successRedirect: '/' })(req, res, next));
+app.get('/logout', (req, res) => res.redirect(strategy.signout(req.user.id_token?.token)));
+app.get('/logout/callback', (req, res) => req.logout(() => res.redirect('/')));

app.listen(port, () => console.log(`Example app listening on port ${port}`));
- Login Route (/login): This route initiates an authentication request with the MonoCloud server.
- Login Callback Route (/login/callback): After a successful authentication the MonoCloud server redirects the user to this endpoint. The handler processes the callback and then redirects the user to the root URL ('/') of the application.
- Logout Route (/logout): When accessed, this route redirects users to the MonoCloud signout URL.
- Logout Callback Route (/logout/callback): After a successful logout, this route serves as the destination where users are redirected.
Add Login and Logout Buttons
- Update the root endpoint handler in your
index.ejsfile to pass the user's state to the view template:
...
app.use(passport.initialize());
app.use(passport.session());

+app.get('/', (req, res) => res.render('index', { user: req.user }));
...
- Update the
index.ejsfile inside theViewsfolder to add the login and logout buttons:
<!DOCTYPE html>
<html>
  <head>
    <title>Node JS Application</title>
  </head>
  <body>
+    <div>
+        <% if (user) { %>
+            <h3>Logged in as <%= user.user_info.email %> 🎉</h3>
+            <a href="/logout">Log out!</a>
+        <% } else { %>
+            <h3>Not Logged in!</h3>
+            <a href="/login">Log In</a>
+        <% } %>
+    </div>
    <p>Welcome to the Node.js Application</p>
  </body>
</html>
Run and Access Your Application
You can now run your application by executing the following command:
npm run start
You can now access your application from your web browser. Go to http://localhost:3000 to access your application.

When you click on the Login button, you will be redirected to the MonoCloud login page. After successfully completing the sign-up process, you will gain access to the application.
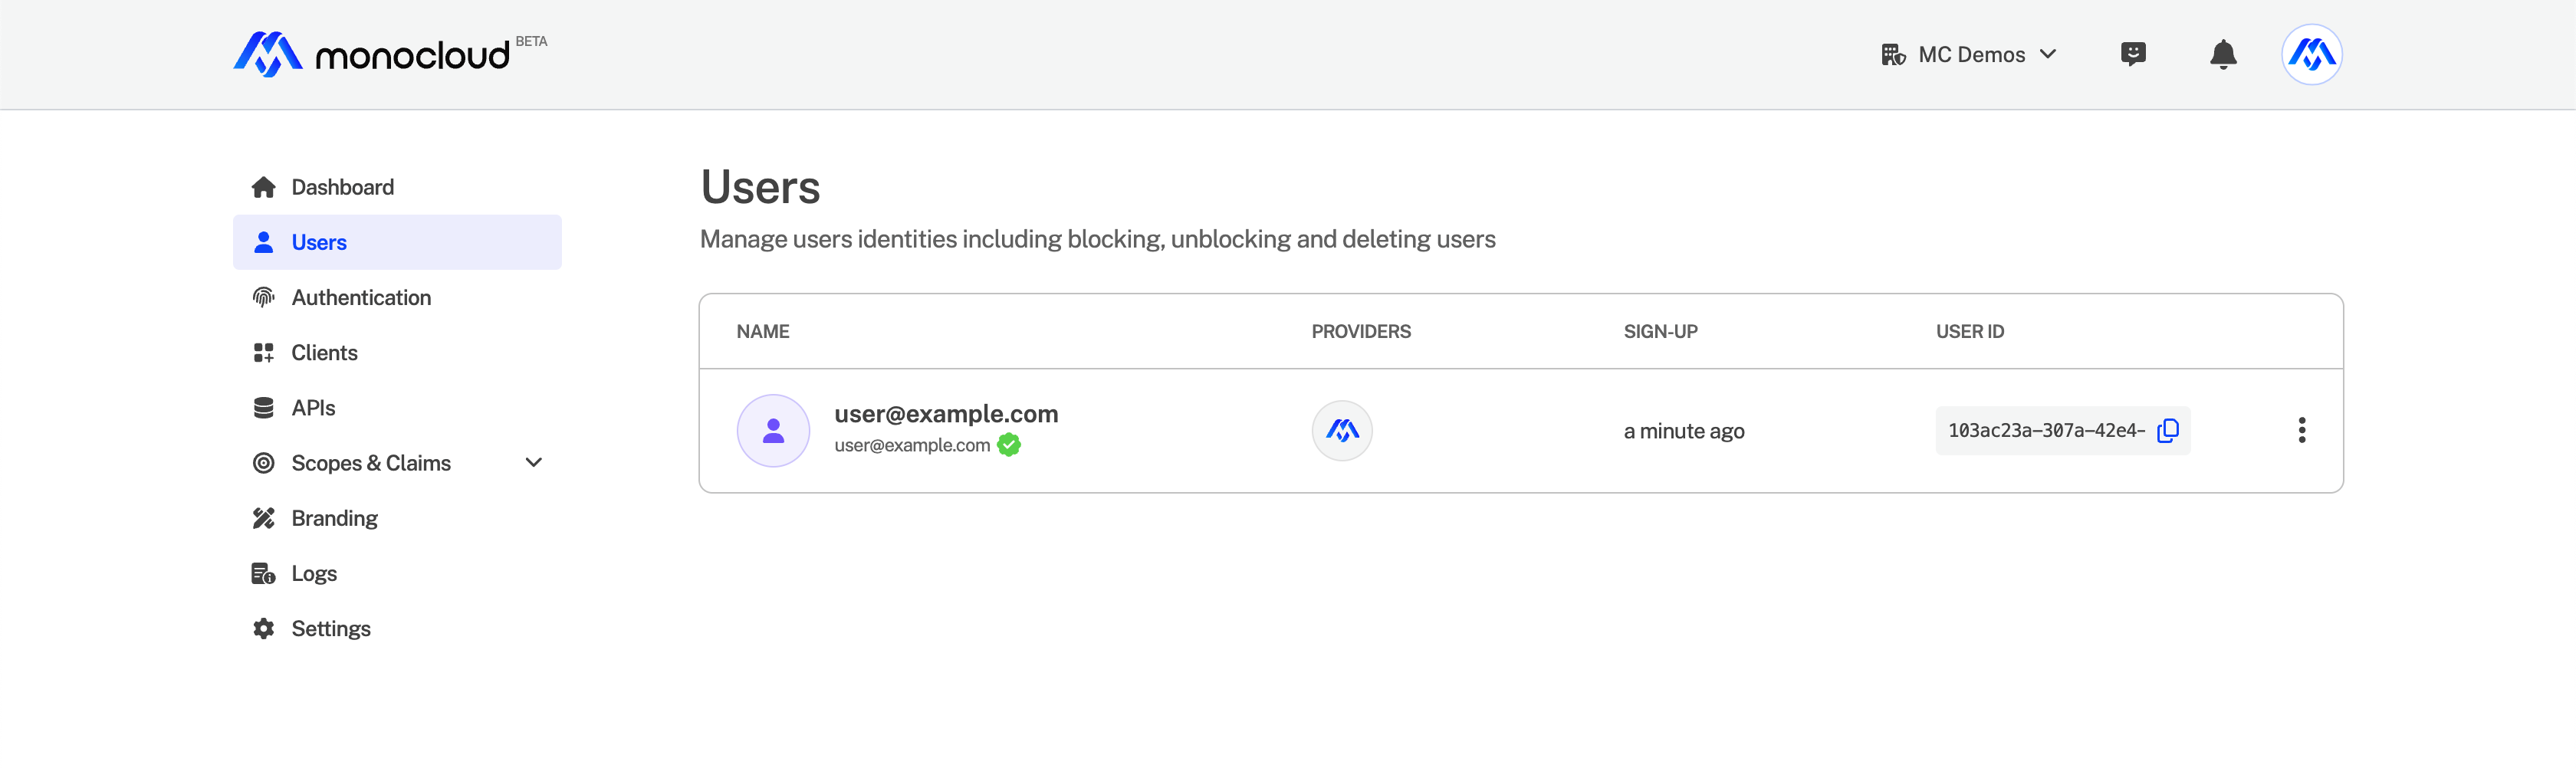
You can view the registered users from the Users section in the MonoCloud Dashboard.
Congratulations! You have now successfully added user authentication to your Node.js Express application.